The garlands were made in record time,
…………a good time was had by all.


And, we loved the snacks!


The garlands were made in record time,
And, we loved the snacks!
Leaf mold is a connoisseur’s choice for soil conditioning. Its attributes significantly improve the quality of your soil by:
It’s simple to make, easy to use, effective…..and it’s free!
You can incorporate leaf mold directly into your garden soil or use it as mulch around your plants. You can mix it with potting soil for use in your container gardens.
So, if you have a tree, or several trees, on your property then you have what you need to make great garden soil.
Step-by-Step Guide to Making Leaf Mold : http://making-mulch-from-leaves
Do not use the following leaves for making leaf mold :
|
Walnut, plant growth inhibitor |
Eucalyptus,plant growth inhibitor |
|
Oak, takes longer to break down |
Camphor laurel, plant growth inhibitor |
——-
Carlotta Lucas
AGC Blog Editor
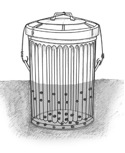
Composting food in a “regular” yard waste compost bin can be tricky. If done incorrectly pest like rats, mice, raccoons, opossums and other critters will be attracted to your compost. But, if you use a food digester to compost food scraps, vermin will not be attracted to your yard while worms are diligently turning your scraps into an nutrient- rich fertilizer.
Food-waste Digester
You can buy a pre-made digester, like the Green-cone by Solarcone, or you can make an easy do-it-yourself food digester following the steps below.
How to build a homemade digester:

Now your new digester is ready to use!

Using Your Digester
Compost Uses
The compost can be used as mulch on established plants, as a soil amendment at planting time, and in potting mixes. Food scrap compost contains more nutrients than yard waste compost, so it should be used sparingly. Applied one-inch of compost as a mulch around plants. Two inches can be dug into garden soil and for a potting mix, add up to 20% food scrap compost to potting soil.
Composting food scraps is a great way to reduce and recycle. By keeping food scraps out of the landfills we not only reduce the production of methane gas, we also reduce the amount of plastic bags going into landfills. Composting food scraps also provide an insight into how much food we waste.
|
Do Compost |
Don’t Compost!! |
|
|
Vegetable scraps |
Meat |
|
|
Grains and pasta |
Fish and poultry |
|
|
Fruit rinds and peels |
Cheese |
|
|
Breads |
Oily foods |
|
|
Coffee grounds, filters |
Butter |
|
|
Tea bags |
Dairy products |
|
|
Paper napkins & towels |
Other animal products |
|
|
Eggshells |
Pet waste |
Carlotta Lucas
AGC Blog Editor
Information:
http://cityofdavis.org/pw/recycle/FoodScrapcompost.cfm
www.seattle.gov/util/groups/public/@spu/@csb/…/spu01_001992.pdf
http://www.vegetablegardener.com/item/8890/diy-food-scrap-digestercomposter
 The fall colors are still on the trees and there’s snow on the pass, but it is not too late to do some garden winterizing.
It’s time to cut perennials to the ground, clean up the debris and fertilize.
Fertilize!
You might be asking, “Why fertilize, isn’t everything going dormant?”
“Won’t fertilizer just make plants grow and get killed by the frost?”
Here are some strategies for fall fertilizing.
Now is the time that I think about adding natural and micro nutrients for the spring growth. Remember the plant is not dead, but slowly taking up nutrients in preparation of spring.
Gena Goddard
AGC Horticulture Chair
The Farm to School program educates children about our food system through hands-on farming and garden programs. Recently a few Ashland Garden Club members attended a Farm to School outing which was held at Eagle Mill Farm, located on Eagle Mill Road in Ashland.
School children, grades K – 3, came with their teachers and a few parents, to gather, cook, and eat a “harvest meal”. Stations where set up for children learn about plant growth, composting, growing vegetables and healthy eating.
Read more about the program here: http://www.rvfarm2school.org/


Peggy Smith
AGC V.P. – Programs
Carlotta Lucas
AGC Blog Editor
 For All The Tea in China; How England Stole the World’s Favorite Drink and Changed History………… by Sarah Rose
This book is the true story of a 19th century botanist, Robert Fortune, who traveled undercover for the East India Company in Qing China to steal tea plants and trade secrets for England. It was the largest and most significant act of corporate espionage in the history of the world. For All the Tea in China is delightful to read.
Sarah Rose wrote this historical narrative like an adventure novel. Besides being full of interesting historical facts, the story has suspense, intrigue, exploitation and explorations. It’s a true story of corporate espionage where pirates, warlords and other eccentric characters lead us through exotic locations and tense situations. Where Victorian capitalism, botanical desire and a national addiction pushes nations into war and causes one man to risk his life for one plant, Camellia sinensis…TEA.
So brew yourself a nice cup of tea, sit down with this book and enjoy.
Carlotta Lucas
ACG Book Club & Blog Editor